---
title: "Joomla Configuratie"
---
# Joomla Configuratie
Joomla heeft enorm veel opties.Zie jij door de bomen het bos niet meer? Ik help je graag weer op weg via de artikelen in deze kennisbank.
## Code wordt automatisch verwijderd
Na het toevoegen van een aangepaste HTML-code in een artikel of een module kom je er misschien achter dat de HTML-code is verwijderd, wanneer het item wordt opgeslagen. Dit probleem komt voor bij scripts (bijvoorbeeld als je Google Adsense probeert toe te voegen) of bij iframe- en embed-tags (bijvoorbeeld bij Youtube videos).
[Lees meer...](https://www.joomill.com/joomla-configuratie/code-wordt-automatisch-verwijderd.md)
## Een oude URL doorverwijzen naar een nieuwe URL in Joomla
Soms kan het voorkomen dat sommige van jouw waardevolle links naar de 404-pagina leiden. Meestal gebeurt dit wanneer de alias van de categorie of het artikel wijzigt of wanneer de categorie of het artikel wordt verwijderd.
[Lees meer...](https://www.joomill.com/joomla-configuratie/doorverwijzen-naar-nieuwe-url-in-joomla.md)
## Home (Start) verwijderen van de homepage
Nadat je Joomla hebt geinstalleerd ga je naar de frontend en je ziet daar "Home" (of "start" bij een meertalige installatie).
[Lees meer...](https://www.joomill.com/joomla-configuratie/home-start-verwijderen-van-de-homepage-in-joomla.md)
## Home (Start) removed from homepage
After you install Joomla, go to the frontend and you will see "Home" (or "start" in a multilingual installation).
[Lees meer...](https://www.joomill.com/joomla-configuratie/home-start-remove-from-homepage-in-joomla.md)
## Redirecting an old URL to a new URL in Joomla
Sometimes, some of your valuable links may lead to the 404 page. This usually happens when the alias of the category or article changes or when the category or article is deleted.
[Lees meer...](https://www.joomill.com/joomla-configuratie/redirect-to-new-url-in-joomla.md)
## Code is automatically deleted
After adding custom HTML code in an article or module, you might find that the HTML code has been removed, when the item is saved. This problem occurs with scripts (for example, when trying to add Google Adsense) or with iframe and embed tags (for example, with YouTube videos).
[Lees meer...](https://www.joomill.com/joomla-configuratie/code-is-automatically-deleted.md)
## Versiebeheer in Joomla
Heb je een aanpassing gedaan in je tekst waar je later spijt van hebt? Of heb je per ongeluk een deel van de tekst verwijderd? Met Joomla's versiebeheer kun je het artikel herstellen.
[Lees meer...](https://www.joomill.com/joomla-configuratie/versiebeheer-in-joomla.md)
## Version management in Joomla
Did you make a change in your text that you later regretted? Or did you accidentally delete part of the text? With Joomla's version control, you can restore the article.
[Lees meer...](https://www.joomill.com/joomla-configuratie/joomla-version-control.md)
## Een IP-adres blokkeren op jouw Joomla-website
Het is natuurlijk mogelijk dat je een bepaald IP-adres de toegang tot je Joomla-website te ontzeggen.
Redenen kunnen zijn:
- Iemand probeert jouw website te hacken.
- Iemand kopieert inhoud van jouw website.
- Iemand linkt naar afbeeldingen of andere media op jouw website.
- Iemand valt je website aan met veel verzoeken.
- Iemand spamt continu jouw website.
[Lees meer...](https://www.joomill.com/joomla-configuratie/een-ip-adres-blokkeren-op-jouw-joomla-website.md)
## Blocking an IP address on your Joomla website
It is, of course, possible to deny a particular IP address access to your Joomla website.
Reasons could be:
- Someone is trying to hack your website.
- Someone is copying content from your website.
- Someone links to images or other media on your website.
- Someone attacks your website with many requests.
- Someone continuously spamming your website.
[Lees meer...](https://www.joomill.com/joomla-configuratie/blocking-an-ip-address-on-your-joomla-website.md)
## Joomla Update Notificatie e-mail uitschakelen
Joomla heeft standaard een plugin die elke beheerder met superuser-rechten e-mailt wanneer een Joomla update beschikbaar is. Er zijn situaties te bedenken waarin het niet nodig is om deze berichten aan alle beheerders te versturen of wanneer je bijvoorbeeld gebruik maakt van een extern beheersysteem zou je deze emails het liefste helemaal uit willen schakelen.
[Lees meer...](https://www.joomill.com/joomla-configuratie/joomla-update-notificatie-email-uitschakelen.md)
## Disable Joomla Update Notification email
Joomla has a plugin by default that emails every administrator with superuser privileges when a Joomla update is available. You can think of situations where it is not necessary to send these messages to all administrators or if you use an external management system, for example, you would prefer to disable these emails altogether.
[Lees meer...](https://www.joomill.com/joomla-configuratie/disable-joomla-update-notification-email.md)
## Tekst aanpassen met taal overrides in Joomla
Wanneer je een tekst wil aanpassen in Joomla of een extensie wordt aangeraden een taal override in Joomla te doen. Hiermee voorkom je dat een wijziging verloren gaat bij een update.
[Lees meer...](https://www.joomill.com/joomla-configuratie/tekst-aanpassen-met-taal-overrides-in-joomla.md)
## Customise text with language overrides in Joomla
When you want to change a text in Joomla or an extension, it is recommended to do a language override in Joomla. This prevents a change from being lost during an update.
[Lees meer...](https://www.joomill.com/joomla-configuratie/text-customize-with-language-overrides-in-joomla.md)
## Toegankelijkheid in Joomla
Websites zijn de laatste jaren een belangrijke bron in ons leven geworden. Het is daarom belangrijk dat jouw Joomla-site voor iedereen toegankelijk is, ook voor mensen met een beperking of handicap. Momenteel is in veel landen de toegankelijkheid van een website ook steeds meer een wettelijke verplichting, in Nederland geldt dit in ieder geval voor alle websites van de overheid.
[Lees meer...](https://www.joomill.com/joomla-configuratie/toegankelijkheid-in-joomla.md)
## Accessibility in Joomla
Websites have become an important resource in our lives in recent years. It is therefore important that your Joomla site is accessible to everyone, including people with disabilities or impairments. Currently, in many countries, website accessibility is also increasingly a legal requirement; in the Netherlands at least, this applies to all government websites.
[Lees meer...](https://www.joomill.com/joomla-configuratie/accessibility-in-joomla.md)
## Spam voorkomen in Joomla met Captcha
Niets is vervelender dan een mailbox vol spamreacties of nep-aanvragen via je contactformulier. Om dit te voorkomen, gebruik je een CAPTCHA: een beveiligingsmaatregel die controleert of een bezoeker een mens is of een script (bot).
Sinds de komst van Joomla 5 zijn de standaard Google reCAPTCHA-plugins uit de installatie verwijderd. Joomla levert dus geen ingebouwde spam-beveiliging meer mee. Je moet nu zelf kiezen welke techniek je wilt gebruiken en hiervoor een plugin installeren.
[Joomla 6.1](https://www.joomill.com/index.php?option=com_content&view=article&id=351:wat-is-nieuw-in-joomla-6-1&catid=8:blog&lang=nl-NL&Itemid=112) heeft een ingebouwde captcha die werkt zonder Google-account, zonder API-sleutel en zonder dat er iets naar een externe server wordt gestuurd. [Lees meer over de CAPTCHA - Proof of Work plugin hier.](https://www.joomill.nl/kennisbank/joomla-extensies/captcha-proof-of-work)
**Stap 1: Kies en installeer een Captcha Plugin**
Omdat de functie niet meer standaard aanwezig is, moet je eerst een plugin downloaden uit [de Joomla Extensions Directory (JED).](https://extensions.joomla.org/tags/captcha/)
Je hebt een aantal logische keuzes:
[Cloudflare Turnstile](https://github.com/SharkyKZ/joomla-turnstile-plugin/releases): Dit is hét moderne alternatief. Het is gratis, veel privacyvriendelijker dan Google.
[Google reCAPTCHA:](https://extensions.joomla.org/extension/access-a-security/recaptcha-v3/) Wil je toch bij Google blijven? Dan moet je een externe plugin installeren die de functionaliteit terugbrengt, dit kan bijv. met de gratis plugin van SharkyKZ
[OCHCaptcha](https://extensions.joomla.org/extension/ochcaptcha/) en [ALTCHA](https://extensions.joomla.org/extension/altcha-for-joomla/): Zijn privacyvriendelijke Captcha's
Installatie:
- Download de gekozen plugin.
- Log in op je Joomla Administrator.
- Ga naar Systeem > Installeren > Extensies.
- Upload en installeer het pakket.
**Stap 2: Sleutels (Keys) aanmaken**
Afhankelijk van je keuze in stap 1, moet je sleutels aanmaken bij de leverancier.
Voor Google reCAPTCHA:
- Ga naar de Google reCAPTCHA Admin Console.
- Kies voor v3 (onzichtbaar) of v2 (vinkje) en voeg je domein toe.
- Kopieer de Site Key en Secret Key.
Voor Cloudflare Turnstile:
- Maak een gratis account aan op Cloudflare.com.
- Ga in het dashboard naar "Turnstile" en voeg je site toe.
- Kopieer de Site Key en Secret Key.
**Stap 3: De Plugin instellen**
Nu koppelen we de sleutels aan je Joomla-site.
Ga in Joomla naar Systeem > Plugins (onder het kopje Beheren).
Zoek de plugin die je in stap 1 hebt geïnstalleerd
Open de plugin en plak de Site Key en Secret Key in de daarvoor bestemde velden.
Zet de Status op Ingeschakeld.
Klik op Opslaan & Sluiten.
**Stap 4: Activeren voor de gehele website**
Als laatste stap moet je Joomla vertellen dat deze nieuwe plugin de "Standaard Captcha" is voor alle formulieren.
Ga naar Systeem > Algemene instellingen (Global Configuration).
Je zit op het tabblad Site.
Zoek de optie Standaard Captcha.
Selecteer hier de naam van de plugin die je zojuist hebt geïnstalleerd.
Zie je "Geen geselecteerd"? Dan staat de plugin nog niet aan of is hij niet geïnstalleerd.
Klik op Opslaan.
Gefeliciteerd! Je contactformulieren en registratiepagina's zijn nu beveiligd tegen spam, met techniek die past bij de huidige standaarden.
Voor Externe formulierplugins zoals RSForms of Tassos Convert Forms zijn eigen captcha's beschikbaar.
[Lees meer...](https://www.joomill.com/joomla-configuratie/recaptcha-spambeveiliging-gebruiken-in-het-joomla-contactformulier.md)
## Preventing spam in Joomla with Captcha
Nothing is more annoying than a mailbox full of spam responses or fake requests via your contact form. To prevent this, use a CAPTCHA: a security measure that checks whether a visitor is a human or a script (bot).
Since the advent of Joomla 5, the default Google reCAPTCHA plugins have been removed from the installation. So Joomla no longer supplies built-in spam protection. You now have to choose which technique you want to use and install a plugin for it.
[Joomla 6.1](https://www.joomill.com/index.php?option=com_content&view=article&id=352:whats-new-in-joomla-6-1&catid=8:blog&lang=en-GB&Itemid=2774) shipped a built-in proof-of-work captcha plugin called plg_captcha_powcaptcha. It is based on the Altcha open-source library, it does not call out to Google or any other third party, and it does not need an API key. [Read more about Captcha - Proof of work plugin](https://www.joomill.com/knowledge-base/joomla-extensions/captcha-proof-of-work-en)
**Step 1: Choose and install a Captcha Plugin**
Since the feature is no longer available by default, you first need to download a plugin from the Joomla Extensions Directory (JED).
You have some logical choices:
Cloudflare Turnstile: This is the modern alternative. It is free, much more privacy-friendly than Google.
Google reCAPTCHA: Still want to stay with Google? Then you need to install an external plugin that brings back the functionality, this can be done e.g. with SharkyKZ's free plugin
OCHCaptcha and ALTCHA: Are privacy-friendly Captchas
Installation:
- Download the chosen plugin.
- Log in to your Joomla Administrator.
- Go to System > Install > Extensions.
- Upload and install the package.
**Step 2: Creating keys**
Depending on your choice in step 1, you need to create keys with the vendor.
For Google reCAPTCHA:
- Go to the Google reCAPTCHA Admin Console.
- Choose v3 (invisible) or v2 (tick) and add your domain.
- Copy the Site Key and Secret Key.
For Cloudflare Turnstile:
- Create a free account on Cloudflare.com.
- In the dashboard, go to "Turnstile" and add your site.
- Copy the Site Key and Secret Key.
**Step 3: Setting up the Plugin**
Now we link the keys to your Joomla site.
In Joomla, go to System > Plugins (under the Manage heading).
Find the plugin you installed in step 1
Open the plugin and paste the Site Key and Secret Key in the appropriate fields.
Set the Status to Enabled.
Click Save & Close.
**Step 4: Activate for the entire website**
As a final step, you need to tell Joomla that this new plugin is the "Default Captcha" for all forms.
Go to System > General Settings (Global Configuration).
You're on the Site tab.
Find the Default Captcha option.
Here, select the name of the plugin you just installed.
Do you see "None selected"? Then the plugin is not yet on or has not been installed.
Click Save.
Congratulations! Your contact forms and registration pages are now protected against spam, with technology that fits current standards.
Custom captchas are available for External form plugins such as RSForms or Tassos Convert Forms.
[Lees meer...](https://www.joomill.com/joomla-configuratie/recaptcha-spam-protection-use-in-the-joomla-contact-form.md)
## Joomla AVG instellingen
25 mei 2018 is de AVG / GDPR van kracht geworden. Waarschijnlijk is jouw mailbox ook overspoeld met wijzigingen in het privacybeleid van verschillende bedrijven. Eigenlijk was het voor Joomla de planning om zich te focussen op de Joomla 4.x serie, maar voor enkele Joomla ontwikkelaars een reden om een nieuwe versie in te lassen met nieuwe privacy-mogelijkheden.
[Lees meer...](https://www.joomill.com/joomla-configuratie/joomla-avg-gdpr-privacyinstellingen.md)
## Joomla GDPR settings
25 May 2018, the GDPR came into force. Probably your mailbox has also been flooded with privacy policy changes from various companies. Actually, Joomla was planning to focus on the Joomla 4.x series, but for some Joomla developers, it was a reason to put in a new version with new privacy features.
[Lees meer...](https://www.joomill.com/joomla-configuratie/joomla-gdpr-settings.md)
## Een menu-item verbergen
In sommige gevallen is het wenselijk om een link te maken naar een ander artikel. Dit is niet altijd mogelijk zonder dat dit gevolgen heeft voor de modules op die pagina. De modules zijn namelijk gekoppeld aan een menu-item en wanneer het artikel waarnaar gelinkt wordt geen menu-item is, dan zullen de modules niet goed getoond worden. In dit geval was het in Joomla mogelijk om een verborgen menu aan te maken ,maar vanaf Joomla 3.5 kan dit nog iets eenvoudiger.
[Lees meer...](https://www.joomill.com/joomla-configuratie/menu-item-verbergen-in-joomla.md)
## Hiding a menu item
In some cases, it is desirable to link to another article. This is not always possible without affecting the modules on that page. This is because the modules are linked to a menu item and if the article being linked to is not a menu item, the modules will not be displayed properly. In this case, it was possible in Joomla to create a hidden menu , but from Joomla 3.5 onwards, this can be done a little easier.
[Lees meer...](https://www.joomill.com/joomla-configuratie/hide-menu-item-in-joomla.md)
## Het menu-item "Uitloggen"
Wanneer je bezoekers de mogelijkheid hebben om in te loggen op je Joomla website dan is de kans groot dat je gebruik maakt van de inlogmodule. Het is ook mogelijk om een menu-item aan te maken met een link naar het inlogformulier. Natuurlijk wil je de knop "inloggen" verbergen en een "uitloggen"-menu-item te tonen aan gebruikers die al ingelogd zijn. In deze blog leg ik je uit hoe je dit in Joomla 3.5 en hoger snel kunt instellen.
## Het menu-item "inloggen"
Om te beginnen maak je een menu-item aan om bezoekers in te laten loggen op je website.

Je kiest het menu-itemtype "Inlogformulier" en je kiest bij Toegang voor "Guest" (Gasten).
Het wijzigingen van Toegang in Guest zorgt ervoor dat dit menu-item verborgen wordt voor ingelogde gebruikers.
## Het menu-item "Uitloggen" voor geregistreerde bezoekers
Omdat het menu-item "inloggen" niet meer zichtbaar is voor ingelogde gebruikers, moet je ook een menu-item aanmaken om uit te loggen.

Je kiest het menu-itemtype "Uitloggen" en je kiest bij Toegang voor "Registered" (Geregistreerd).
Het wijzigingen van Toegang in Registered zorgt ervoor dat dit menu-item alleen getoond wordt aan ingelogde gebruikers.
Let op: Het menu-item "uitloggen" verwijst niet naar een formulier of pagina, maar zorgt ervoor dat een gebruik direct wordt uitgelogd wanneer hij op deze knop klikt.
## Foutmelding: "U bent niet bevoegd deze pagina te bekijken." oplossen
Zoals je ziet krijg je na het inloggen een foutmelding: "U bent niet bevoegd deze pagina te bekijken." ( of in het Engels "You are not authorised to view this resource." )
De melding krijg je te zien omdat de inlogpagina niet meer te zien is voor geregistreerde gebruikers.
Om dit op te lossen heb je het menu-item ID van je homepage nodig. In mijn geval is dit ID 101

Ga terug naar het menu-item "Inloggen" en kies voor het 2e tabblad "Opties"
Voer bij Inlogverwijzing de link in: index.php?Itemid=101 (Vervang het getal 101 door jouw eigen menu-item ID)

[Lees meer...](https://www.joomill.com/joomla-configuratie/menuitem-inloggen-uitloggen-geregistreerde-bezoekers.md)
## The "Logout" menu item
If your visitors have the option of logging in to your Joomla website, chances are you are using the login module. It is also possible to create a menu item with a link to the login form. Of course, you want to hide the "login" button and show a "logout" menu item to users who are already logged in. In this blog, I'll explain how to quickly set this up in Joomla 3.5 and above.
## The "login" menu item
To start, you create a menu item to let visitors log in to your website.

You choose the menu item type "Login form" and choose "Guest" under Access.
Changing Access to Guest will hide this menu item from logged-in users.
## The "Logout" menu item for registered visitors
Since the "log in" menu item is no longer visible to logged-in users, you also need to create a menu item to log out.

You choose the menu item type "Logout" and choose "Registered" under Access.
Changing Access to Registered ensures that this menu item is only shown to logged-in users.
Note: The menu item "logout" does not refer to a form or page, but ensures that a user is immediately logged out when he clicks this button.
## Error message: "You are not authorised to view this page." fix
As you can see, you get an error message after logging in: "You are not authorised to view this page" ( or in English "You are not authorised to view this resource." ).
You get the message because the login page can no longer be viewed by registered users.
To solve this, you need the menu item ID of your homepage. In my case, this is ID 101

Go back to the menu item "Login" and choose the 2nd tab "Options"
Under Login reference, enter the link: index.php?Itemid=101 (Replace the number 101 with your own menu item ID)

[Lees meer...](https://www.joomill.com/joomla-configuratie/menuitem-inlog-out-logging-registered-visitors.md)
## SSL (HTTPS) activeren in Joomla
**Joomla Forceer SSL** is de ingebouwde optie om een beveiligde verbinding op jouw Joomla-website af te dwingen.
SSL (tegenwoordig technisch TLS genoemd) is een beveiligingsprotocol dat gegevens versleutelt die worden verstuurd tussen de browser van de bezoeker en jouw webserver. Hierdoor verandert het adres van `[http://` naar](http://` naar) `[https://` en](https://` en) verschijnt er een slotje in de browserbalk.
## Waarom is SSL noodzakelijk?
Vroeger was SSL vooral nodig voor webshops. Tegenwoordig is het **voor elke website verplicht**, om drie redenen:
1. **Beveiliging:** Het beschermt wachtwoorden en formuliergegevens tegen onderschepping.
2. **Vertrouwen:** Browsers zoals Google Chrome markeren websites zonder SSL als "Niet veilig", wat bezoekers afschrikt.
3. **SEO (Google Ranking):** Google gebruikt HTTPS als een rankingsfactor. Websites zonder SSL scoren lager in de zoekresultaten.
## Welk SSL Certificaat moet je kiezen?
Er zijn verschillende soorten certificaten. De versleuteling (encryptie) is bij allemaal even veilig, maar de manier van validatie verschilt:
1. **Let’s Encrypt (Gratis & Standaard)**Dit is tegenwoordig de **meest gekozen optie**. Let’s Encrypt is een initiatief van grote partijen (o.a. Google en Cisco) om het web veiliger te maken. Het is gratis, veilig en wordt door de meeste hostingpartijen automatisch verlengd. Voor 95% van de websites is dit de beste keuze
2. **Domein Validatie (Standaard Betaald)**
Vergelijkbaar met Let's Encrypt, maar vaak met een financiële garantie (verzekering) vanuit de uitgever.
**Let op:** Vroeger dekte dit vaak maar één variant (www of niet-www). Tegenwoordig dekken de meeste standaard certificaten zowel `website.nl` als `www.website.nl`.
3. **Wildcard Certificaat**Nodig als je veel subdomeinen gebruikt. Hiermee beveilig je `*.website.nl`. Dus: `www.website.nl`, `shop.website.nl`, `mail.website.nl`, etc., allemaal met één certificaat.
4. **Uitgebreide Validatie (EV) - Zakelijk**Hierbij worden jouw bedrijfsgegevens streng gecontroleerd door de uitgevende instantie.
**Belangrijke update:** Vroeger kreeg je bij een EV-certificaat een **groene adresbalk** met de bedrijfsnaam.
*Moderne browsers (Chrome, Firefox, Safari) tonen deze groene balk niet meer.* De bedrijfsgegevens zijn alleen nog zichtbaar als je op het slotje klikt. Het visuele voordeel is dus verdwenen, maar voor grote organisaties kan het interne validatieproces nog steeds van waarde zijn.
## Voordat je begint: De vereisten
Om SSL in te schakelen in Joomla, moet de basis goed staan bij je hosting:
***Het SSL Certificaat moet geïnstalleerd zijn:** Dit doe je meestal via het controlepaneel van je hosting (zoals DirectAdmin, cPanel of Plesk). Vaak kan dit met één klik via de optie "Let's Encrypt".
* **Géén Dedicated IP meer nodig:** Het originele artikel vermeldde dat je een uniek IP-adres nodig hebt. Dankzij **SNI (Server Name Indication)** is dit al jaren niet meer nodig. Je kunt gewoon je huidige gedeelde IP-adres gebruiken.
## SSL inschakelen in Joomla (Stappenplan)
Is het certificaat actief op de server? Test dit eerst door naar `[https://jouw-domein.nl`](https://jouw-domein.nl`) te surfen. Zie je de site (ook al ziet de opmaak er misschien raar uit)? Dan kun je het in Joomla activeren.
1. Log in op de **Administrator (backend)** van je Joomla site.
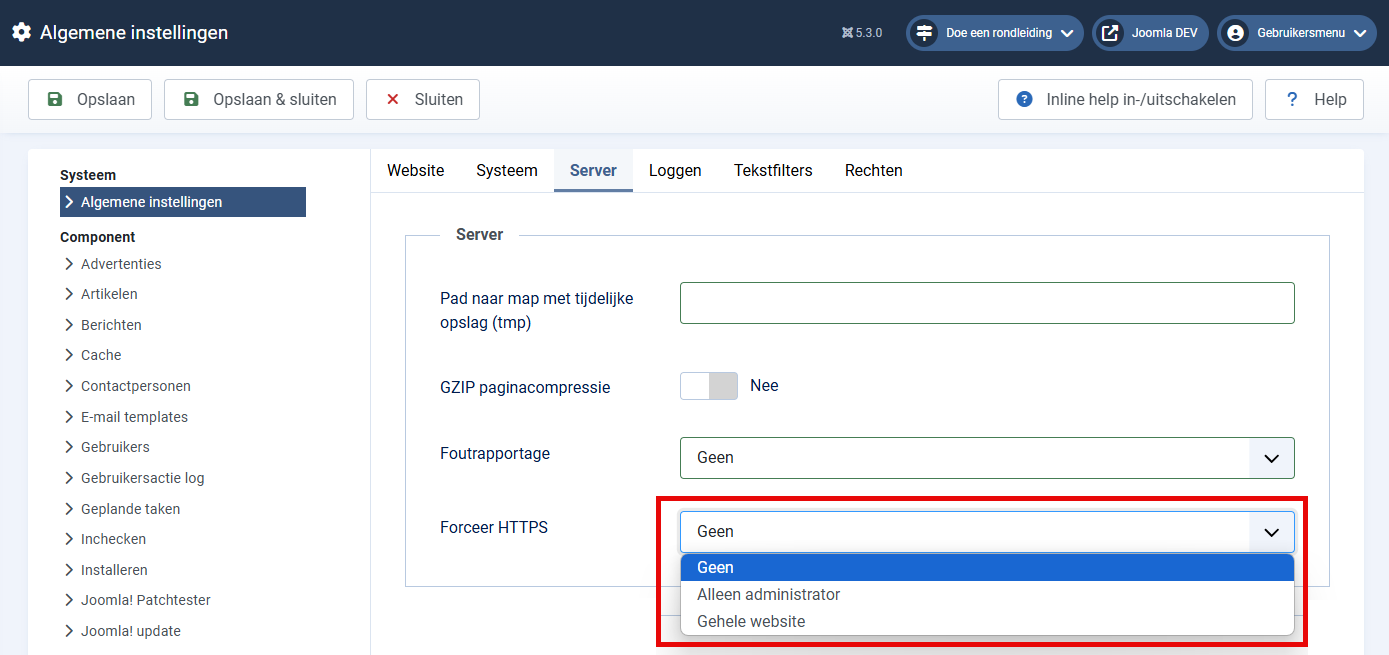
2. Ga naar **Systeem** >> **Algemene instellingen** (Global Configuration).
3. Je bevindt je nu op het tabblad Site. Klik op het tabblad **Server**.
4. Zoek de optie **Forceer SSL** (Force HTTPS). Je hebt drie keuzes:
Geen: SSL staat uit (niet aanbevolen).
Alleen administrator: Alleen de backend is beveiligd.
Gehele website: Zowel de bezoeker als de beheerder gebruiken altijd HTTPS.
5. Kies voor **Gehele website**.
6. Klik op **Opslaan**.
> **Waarschuwing:** Als je SSL forceert terwijl het certificaat op de server nog niet werkt, sluit je jezelf buiten. Kun je niet meer inloggen? Open dan via FTP het bestand `configuration.php` en verander de regel `public $force_ssl = '2';` naar `public $force_ssl = '0';`.
## Probleemoplossing: Het slotje is niet groen/dicht?
Heb je SSL aangezet, maar geeft de browser aan "Niet volledig beveiligd" of zie je geen slotje? Dan heb je last van **Mixed Content**.
Dit betekent dat de pagina via HTTPS wordt geladen, maar dat er afbeeldingen, scripts of stylesheets in de code staan die nog via HTTP worden ingeladen (bijv.  ).
**Oplossing:**
Gebruik een extensie zoals **DB Replacer** of **Better Search Replace** om in je database alle verwijzingen van http:// te wijzigen naar https://
Controleer instellingen van specifieke componenten of templates; soms staan logo's of links daar "hardcoded" met http.
**Vergeet niet:**
Pas ook externe diensten aan. Denk aan Google Analytics, Google Search Console en betaalproviders (zoals Mollie of PayPal); geef daar door dat je website nu op `https` draait.
Ondervindt je problemen met het SSL Certificaat, gebruik dan de [SSL Certificate Tools](https://www.sslshopper.com/ssl-certificate-tools.html)
[Lees meer...](https://www.joomill.com/joomla-configuratie/gebruik-van-ssl-https-op-joomla-website.md)
## Activate SSL (HTTPS) in Joomla
**Joomla Force SSL** is the built-in option to enforce a secure connection on your Joomla website.
SSL (now technically called TLS) is a security protocol that encrypts data sent between the visitor's browser and your web server. As a result, the address changes from `http://`[to](http://` naar) `https://`[and](https://` en) a lock icon appears in the browser bar.
## Why is SSL necessary?
SSL used to be required mainly for webshops. Nowadays, it is **mandatory for every website**, for three reasons:
1. **Security:** It protects passwords and form data from interception.
2. **Trust:** Browsers such as Google Chrome mark websites without SSL as "Not Secure", which deters visitors.
3. **SEO (Google Ranking):** Google uses HTTPS as a ranking factor. Websites without SSL rank lower in search results.
## Which SSL Certificate should you choose?
There are different types of certificates. The encryption (encoding) is equally secure with all of them, but the method of validation differs:
1. **Let's Encrypt (Free & Standard)**This is the **most commonly chosen option** these days. Let's Encrypt is an initiative by major parties (including Google and Cisco) to make the web more secure. It is free, secure and is automatically renewed by most hosting parties. For 95% of websites, this is the best choice
2. **Domain Validation (Standard Paid)**
Similar to Let's Encrypt, but often with a financial guarantee (insurance) from the publisher.
**Note:** This often used to cover only one variant (www or non-www). Nowadays, most standard certificates cover both `website.co.uk` and `www.website.nl`.
3. **Wildcard Certificate**Necessary if you use many subdomains. With this you secure `*.website.co.uk`. So: `www.website.nl`, `shop.website.nl`, `mail.website.nl`, etc., all with one certificate.
4. **Extended Validation (EV) - Business**Here, your business details are strictly checked by the issuing authority.
**Important update:** EV certificates used to give you a **green address bar** with the company name.
*Modern browsers (Chrome, Firefox, Safari) no longer show this green bar, and* the company details are only visible when you click the lock icon. So the visual benefit is gone, but for large organisations, the internal validation process can still be of value.
## Before you start: the requirements
To enable SSL in Joomla, the basics need to be right with your hosting:
*The**SSL Certificate must be installed:** you usually do this through your hosting's control panel (such as DirectAdmin, cPanel or Plesk). This can often be done with a single click via the "Let's Encrypt" option.
* **No more need for a dedicated IP:** The original article mentioned that you need a unique IP address. Thanks to **SNI (Server Name Indication),** this has not been necessary for years. You can just use your current shared IP address.
## Enabling SSL in Joomla (Roadmap)
Is the certificate active on the server? Test this first by surfing to [`https://jouw-domein.nl`](https://jouw-domein.nl`). Do you see the site (even though the layout might look weird)? Then you can activate it in Joomla.
1. Log in to the **Administrator (backend)** of your Joomla site.
2. Go to **System** >> **Global Configuration**.
3. You are now on the Site tab. Click on the **Server** tab.
4. Find the option **Force SSL** (Force HTTPS). You have three choices:
None: SSL is off (not recommended).
Administrator only: Only the backend is secured.
Entire website: Both visitor and administrator always use HTTPS.
5. Select **Entire website**.
6. Click **Save**.
> **Warning:** If you force SSL while the certificate is not yet working on the server, you lock yourself out. Can't log in anymore? Then open the `configuration.php` file via FTP and change the line `public $force_ssl = '2';` to `public $force_ssl = '0';`.

## Troubleshooting: The lock is not green/close?
Have you enabled SSL, but the browser indicates "Not fully secured" or you don't see a lock? Then you are suffering from **Mixed Content**.
This means that the page is loaded via HTTPS, but there are images, scripts or style sheets in the code that are still loaded via HTTP (e.g. ).
**Solution:**
Use an extension such as **DB Replacer** or **Better Search Replace** to change all references in your database from http:// to https://
Check settings of specific components or templates; sometimes logos or links are "hardcoded" with http there.
**Don't forget:**
Adjust external services as well. Think of Google Analytics, Google Search Console and payment providers (such as Mollie or PayPal); specify there that your website now runs on `https`.
If you experience problems with the SSL Certificate, use the [SSL Certificate Tools](https://www.sslshopper.com/ssl-certificate-tools.html)
[Lees meer...](https://www.joomill.com/joomla-configuratie/use-of-ssl-https-on-joomla-website.md)
## Extensies installeren van web
Omdat ik veel bezig ben met het uitproberen van de mogelijkheden van extensies, merk ik regelmatig dat mijn computer vol staat met verdwaalde installatiebestanden. Ik vind ze in mijn downloads, mijn bureaublad, het mapje "nog uitzoeken" en ga zo maar door.
[Lees meer...](https://www.joomill.com/joomla-configuratie/extensies-installeren-van-web.md)
## Installing extensions from web
Since I am doing a lot of trying out extensions, I regularly find that my computer is full of stray installation files. I find them in my downloads, my desktop, the "still figuring out" folder and so on.
[Lees meer...](https://www.joomill.com/joomla-configuratie/extensions-install-from-web.md)
).
**Oplossing:**
Gebruik een extensie zoals **DB Replacer** of **Better Search Replace** om in je database alle verwijzingen van http:// te wijzigen naar https://
Controleer instellingen van specifieke componenten of templates; soms staan logo's of links daar "hardcoded" met http.
**Vergeet niet:**
Pas ook externe diensten aan. Denk aan Google Analytics, Google Search Console en betaalproviders (zoals Mollie of PayPal); geef daar door dat je website nu op `https` draait.
Ondervindt je problemen met het SSL Certificaat, gebruik dan de [SSL Certificate Tools](https://www.sslshopper.com/ssl-certificate-tools.html)
[Lees meer...](https://www.joomill.com/joomla-configuratie/gebruik-van-ssl-https-op-joomla-website.md)
## Activate SSL (HTTPS) in Joomla
**Joomla Force SSL** is the built-in option to enforce a secure connection on your Joomla website.
SSL (now technically called TLS) is a security protocol that encrypts data sent between the visitor's browser and your web server. As a result, the address changes from `http://`[to](http://` naar) `https://`[and](https://` en) a lock icon appears in the browser bar.
## Why is SSL necessary?
SSL used to be required mainly for webshops. Nowadays, it is **mandatory for every website**, for three reasons:
1. **Security:** It protects passwords and form data from interception.
2. **Trust:** Browsers such as Google Chrome mark websites without SSL as "Not Secure", which deters visitors.
3. **SEO (Google Ranking):** Google uses HTTPS as a ranking factor. Websites without SSL rank lower in search results.
## Which SSL Certificate should you choose?
There are different types of certificates. The encryption (encoding) is equally secure with all of them, but the method of validation differs:
1. **Let's Encrypt (Free & Standard)**This is the **most commonly chosen option** these days. Let's Encrypt is an initiative by major parties (including Google and Cisco) to make the web more secure. It is free, secure and is automatically renewed by most hosting parties. For 95% of websites, this is the best choice
2. **Domain Validation (Standard Paid)**
Similar to Let's Encrypt, but often with a financial guarantee (insurance) from the publisher.
**Note:** This often used to cover only one variant (www or non-www). Nowadays, most standard certificates cover both `website.co.uk` and `www.website.nl`.
3. **Wildcard Certificate**Necessary if you use many subdomains. With this you secure `*.website.co.uk`. So: `www.website.nl`, `shop.website.nl`, `mail.website.nl`, etc., all with one certificate.
4. **Extended Validation (EV) - Business**Here, your business details are strictly checked by the issuing authority.
**Important update:** EV certificates used to give you a **green address bar** with the company name.
*Modern browsers (Chrome, Firefox, Safari) no longer show this green bar, and* the company details are only visible when you click the lock icon. So the visual benefit is gone, but for large organisations, the internal validation process can still be of value.
## Before you start: the requirements
To enable SSL in Joomla, the basics need to be right with your hosting:
*The**SSL Certificate must be installed:** you usually do this through your hosting's control panel (such as DirectAdmin, cPanel or Plesk). This can often be done with a single click via the "Let's Encrypt" option.
* **No more need for a dedicated IP:** The original article mentioned that you need a unique IP address. Thanks to **SNI (Server Name Indication),** this has not been necessary for years. You can just use your current shared IP address.
## Enabling SSL in Joomla (Roadmap)
Is the certificate active on the server? Test this first by surfing to [`https://jouw-domein.nl`](https://jouw-domein.nl`). Do you see the site (even though the layout might look weird)? Then you can activate it in Joomla.
1. Log in to the **Administrator (backend)** of your Joomla site.
2. Go to **System** >> **Global Configuration**.
3. You are now on the Site tab. Click on the **Server** tab.
4. Find the option **Force SSL** (Force HTTPS). You have three choices:
None: SSL is off (not recommended).
Administrator only: Only the backend is secured.
Entire website: Both visitor and administrator always use HTTPS.
5. Select **Entire website**.
6. Click **Save**.
> **Warning:** If you force SSL while the certificate is not yet working on the server, you lock yourself out. Can't log in anymore? Then open the `configuration.php` file via FTP and change the line `public $force_ssl = '2';` to `public $force_ssl = '0';`.

## Troubleshooting: The lock is not green/close?
Have you enabled SSL, but the browser indicates "Not fully secured" or you don't see a lock? Then you are suffering from **Mixed Content**.
This means that the page is loaded via HTTPS, but there are images, scripts or style sheets in the code that are still loaded via HTTP (e.g. ).
**Solution:**
Use an extension such as **DB Replacer** or **Better Search Replace** to change all references in your database from http:// to https://
Check settings of specific components or templates; sometimes logos or links are "hardcoded" with http there.
**Don't forget:**
Adjust external services as well. Think of Google Analytics, Google Search Console and payment providers (such as Mollie or PayPal); specify there that your website now runs on `https`.
If you experience problems with the SSL Certificate, use the [SSL Certificate Tools](https://www.sslshopper.com/ssl-certificate-tools.html)
[Lees meer...](https://www.joomill.com/joomla-configuratie/use-of-ssl-https-on-joomla-website.md)
## Extensies installeren van web
Omdat ik veel bezig ben met het uitproberen van de mogelijkheden van extensies, merk ik regelmatig dat mijn computer vol staat met verdwaalde installatiebestanden. Ik vind ze in mijn downloads, mijn bureaublad, het mapje "nog uitzoeken" en ga zo maar door.
[Lees meer...](https://www.joomill.com/joomla-configuratie/extensies-installeren-van-web.md)
## Installing extensions from web
Since I am doing a lot of trying out extensions, I regularly find that my computer is full of stray installation files. I find them in my downloads, my desktop, the "still figuring out" folder and so on.
[Lees meer...](https://www.joomill.com/joomla-configuratie/extensions-install-from-web.md)